Contacts Continuing to Get Emails From a Disconnected Email
As you begin using Close, we recommend you handle all of your customer communication through Close directly.
In addition to always having relevant information at your fingertips, you'll take advantage of the critical features of the platform.
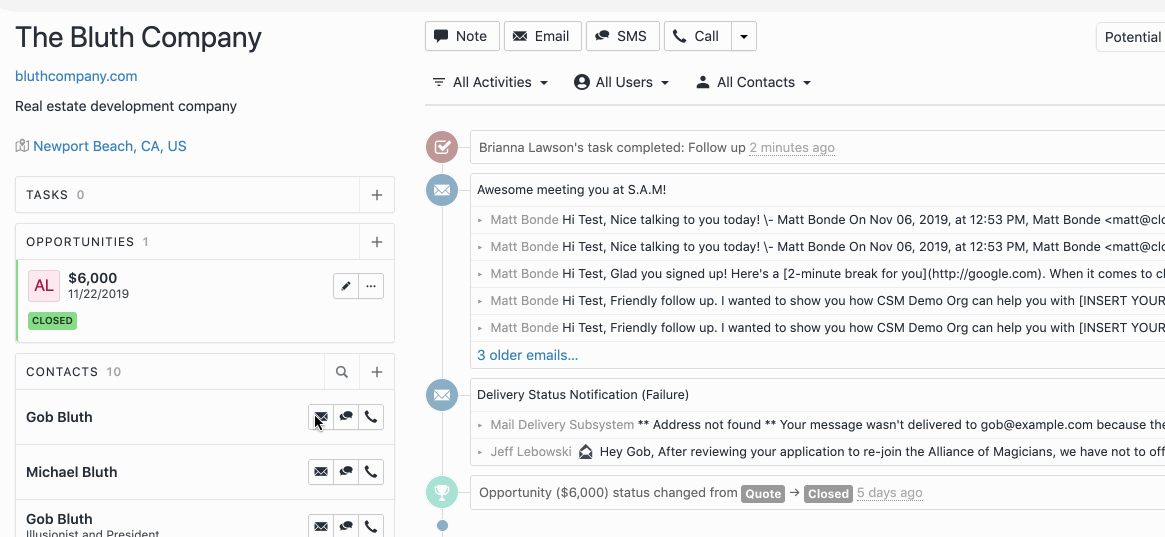
To send an email to a Lead, simply locate the Contact and click on the email icon. You can click on additional Contacts if you want to send to multiple people.
 Sending an Email
Craft and send your messages as you would in any email client. Embed images, links, and attachments as needed.
Any attachments on outgoing or incoming messages will be available for download.
Any email you receive will go into your Close Inbox as a notification and sync onto the Lead itself.
You can reply to those emails either from your Inbox directly or on the Lead page and mark the email as done.
Click this icon to reply to an email. 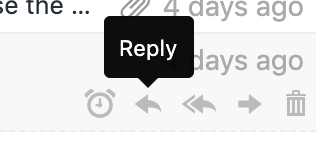
Email Syncing
The only emails that will sync are those between your Connected Email Accounts and those email addresses added to your Contacts in your Close database.
Close will not automatically sync your whole Inbox! First, you must add the email addresses you want to sync to your Contacts on the Lead page.
Email Attachments
Email attachments in Close allow you to send and receive external files with your emails.
Attach a file to an email when:
- Sending an individual email;
- Sending an Email Template.
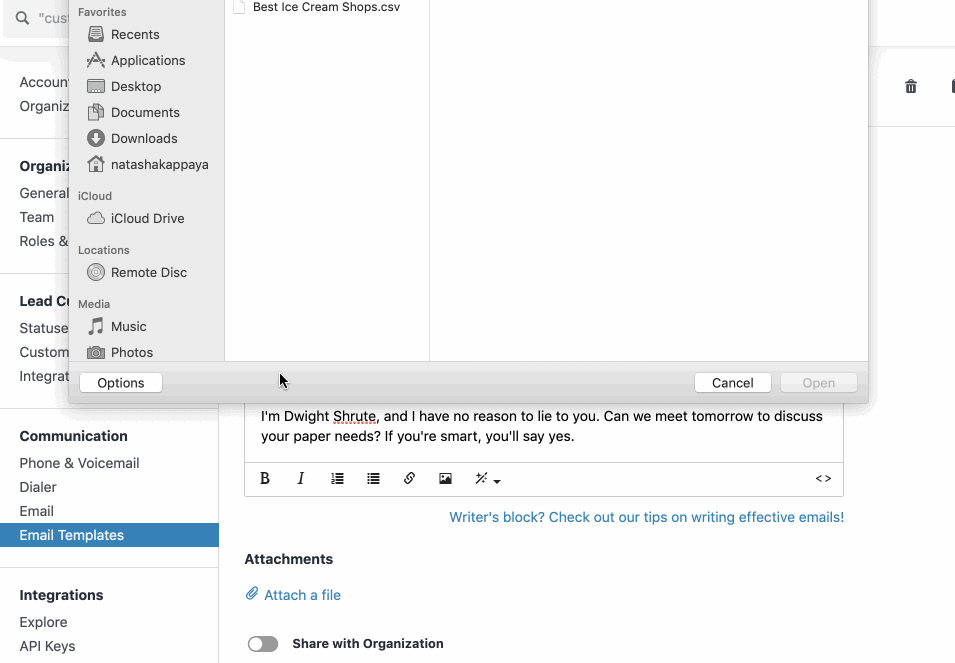
To attach a file to an individual email, click on the paper clip icon at the bottom of your email draft and select your file.
 Attach a file to an email
Email Templates can also include attachments. This can be useful if you have a post-demo PDF or if you send blank contracts when an opportunity is about to close.
Attachment limits!
If you're using Gmail/GSuite/Office 365, keep your attachments under 25MB. Otherwise, your email account will disconnect due to the max file size limit. Each email service provider will have its own max file size limits. Ensure you're complying with those limits. If in doubt, reach out to your email service provider since these limits may vary from service to service and change over time.
Customizing an Email Template with HTML
Close's code editor allows you to customize the appearance of emails you send from Close.
Similar to attachments, you can use the code editor when:
- Sending an individual email;
- Sending an Email Template.
To input custom code into an email, simply click on the "< >" (code view button) at the bottom of your email draft and paste your information as shown below.
Email Reminders
Set a follow-up Reminder to have Close automatically remind you if a Lead has not responded to your latest email.
Using follow-up Reminders instead of creating a Task is a great way to remove clutter from your Inbox and provide more context when following up with a Lead.
To set an email Reminder, simply check the "Remind me to follow up" box and select the timeframe or date from the dropdown.
 Setting an Email Reminder
The clock icon indicates the email has a follow-up Reminder attached. Hover over this icon to see when your Reminder is set.
Reminders are automatically cleared if someone responds. Another great reason to use them instead of Tasks.
 Active Reminder Indication
If your email does not receive a reply by the date of your Reminder, you'll see the Reminder appear in your Inbox.
 Inbox Reminder Task
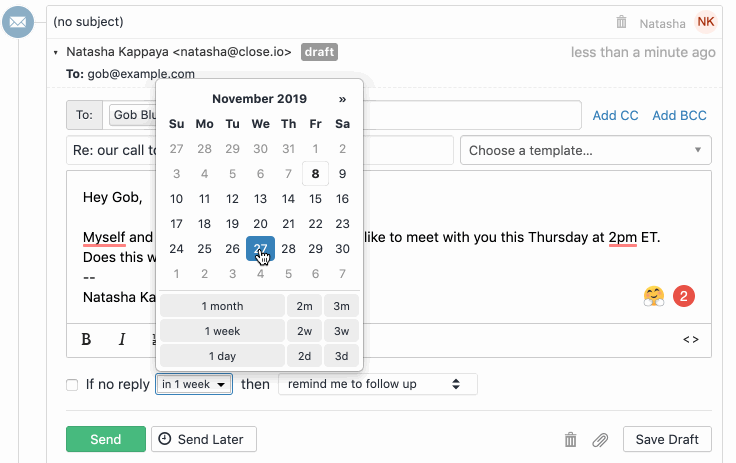
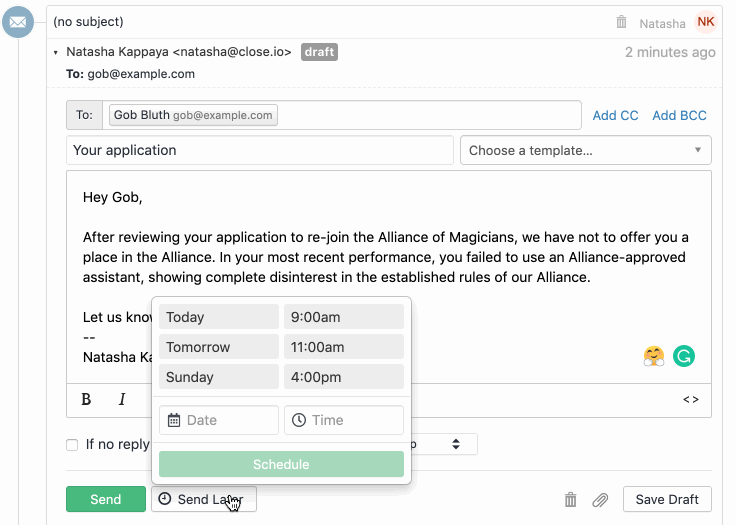
Scheduling an Email
Close allows you to draft an email and send it at a future date/time. Sending later is a great way to automate specific workflows.
For example, if you have a demo set with a customer, you might want to schedule a reminder email to go out the day before, hopefully ensuring your Lead attends your demo.
Your email will go out at the date and time you set. You will see the email says scheduled, and can convert the email back to a draft if needed.
Send Later date & time are always based on your current timezone.
 Scheduling an Email
Recorded email activity date (and email activity date tooltip).
In the top right of an Email activity, we will always show you the date when an email was initially created, not when it was actually sent/scheduled to send. If you schedule an email on Monday (thus creating the email activity) to go on Friday (the actual date it will be sent), the tooltip email date will show the Monday date, but the email itself will go out on Friday as intended.
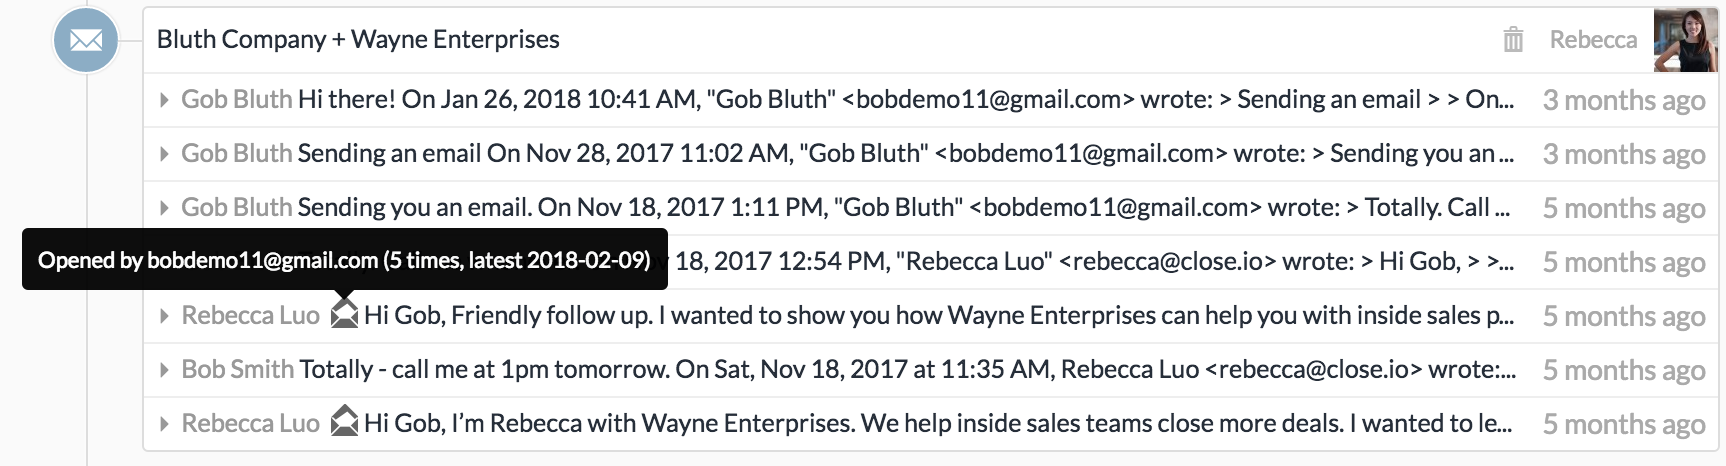
Tracking Email Opens
By default, Close will track the opens of any email you send from within Close. You will see an indication on each message that the email was opened.
You can hover over the indicator for additional information, such as the email address that opened the message, when it was opened, and how many times it was opened.
If you don't see any icons, the email open wasn't registered yet.
 Email Tracking Popover
If you're sending emails from outside of Close, the tracking information will not be available within Close. Also, depending on the recipient's email client setup, your opens may not be able to be tracked. That means that your open rates are likely higher than you'll see in reporting.
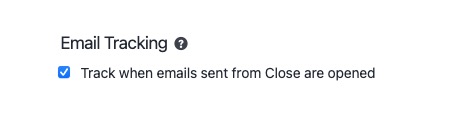
To turn this setting on or off, go to Settings > Communication > Email and look for this checkbox.
 Email Tracking Setting
Sending as Another Email Address
If your team sends certain materials from a generic address or you have multiple email accounts synced in under your Settings > Connected Accounts, your email addresses will appear as a dropdown when drafting an email. Simply click on it to adjust the sender while keeping your email signature the same.
 Sending from Another Address
Sending as Another User
If you want to send a message on behalf of other Close users and their email addresses, you can use the Send As feature. You can use Send As in manual, bulk, and sequence emails.
Do you have the right plan for Send As?
The Send As feature is only available to Pro and Business plans. You can upgrade your plan under Settings > Billing > Plan.
Sending emails to internal domains using Send As.
You cannot send emails to your company domain email addresses using the Send As feature.
If you try to send a Sequence from adam@example.comto john@example.com, that email will instead error out and not be sent at all.
Send As List
The Send As feature is available only to users who explicitly allow other users to send on their behalf. If you'd like to send as another user, that user must first add you to their Allowed By Youlist under Settings > Send As. In the example below, Katie is adding John so he can send emails on her behalf.
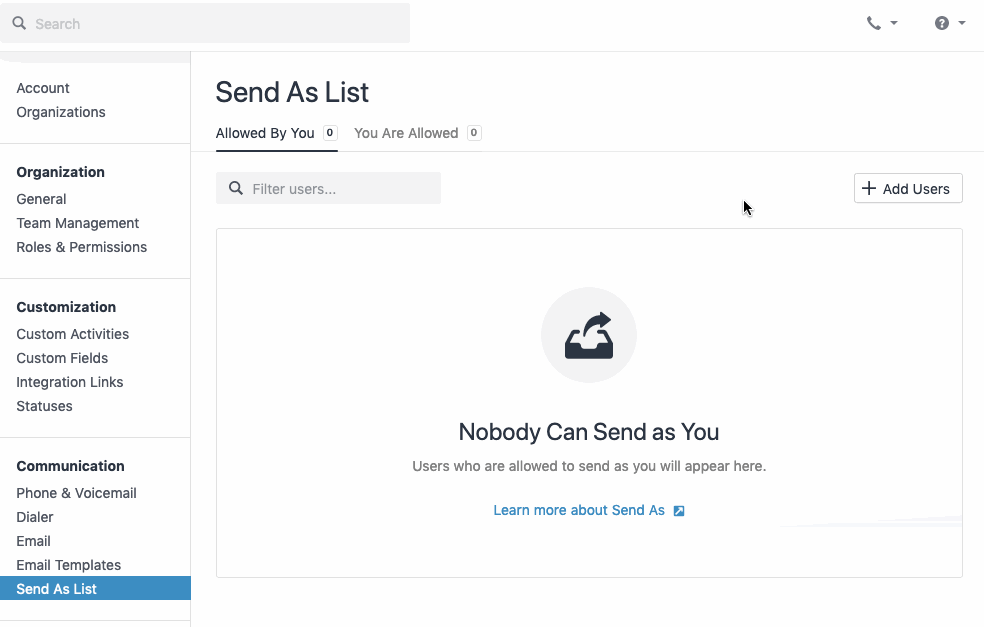
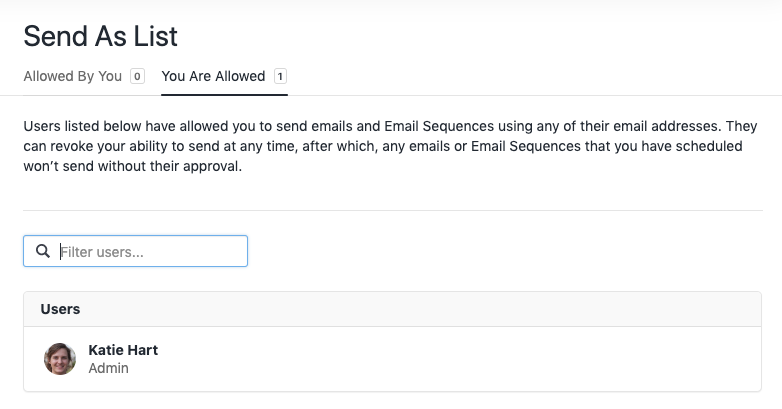
When Katie added John to her Allowed By Youlist, at the same time, John will see Katie in his You Are Allowedlist that is read-only and shows you which users allowed you to send emails on their behalf.
Revoke Allowed User
You can revoke this permission at any time by going to your Send As List > Allowed By You > click on X button.
Any emails that have been scheduled won't send without your approval, and any existing email sequences will be automatically paused.
Selecting a Sender
With John being added to Katie's Send As list, John can go to his lead page and start sending as Katie by selecting her email from the dropdown.
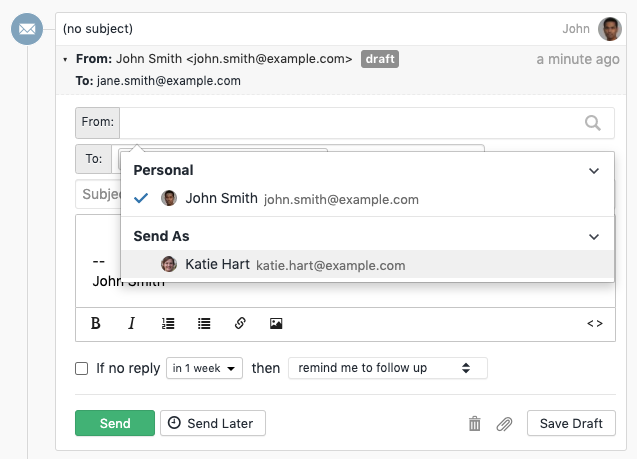
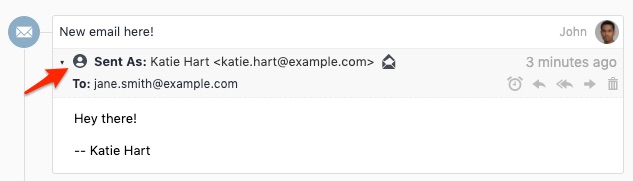
Katie's signature will be used, and after the email is sent out, there will be a "Sent As:" indication in place of the "From:" field.
The same dropdown is available in Bulk Emails and Email Sequences.

Email Replies
Replies to Sent As emails will go to the Inbox of the user who allowed the sending on their behalf.
In the example above, Katie would receive a reply to an email that John "sent as" her.
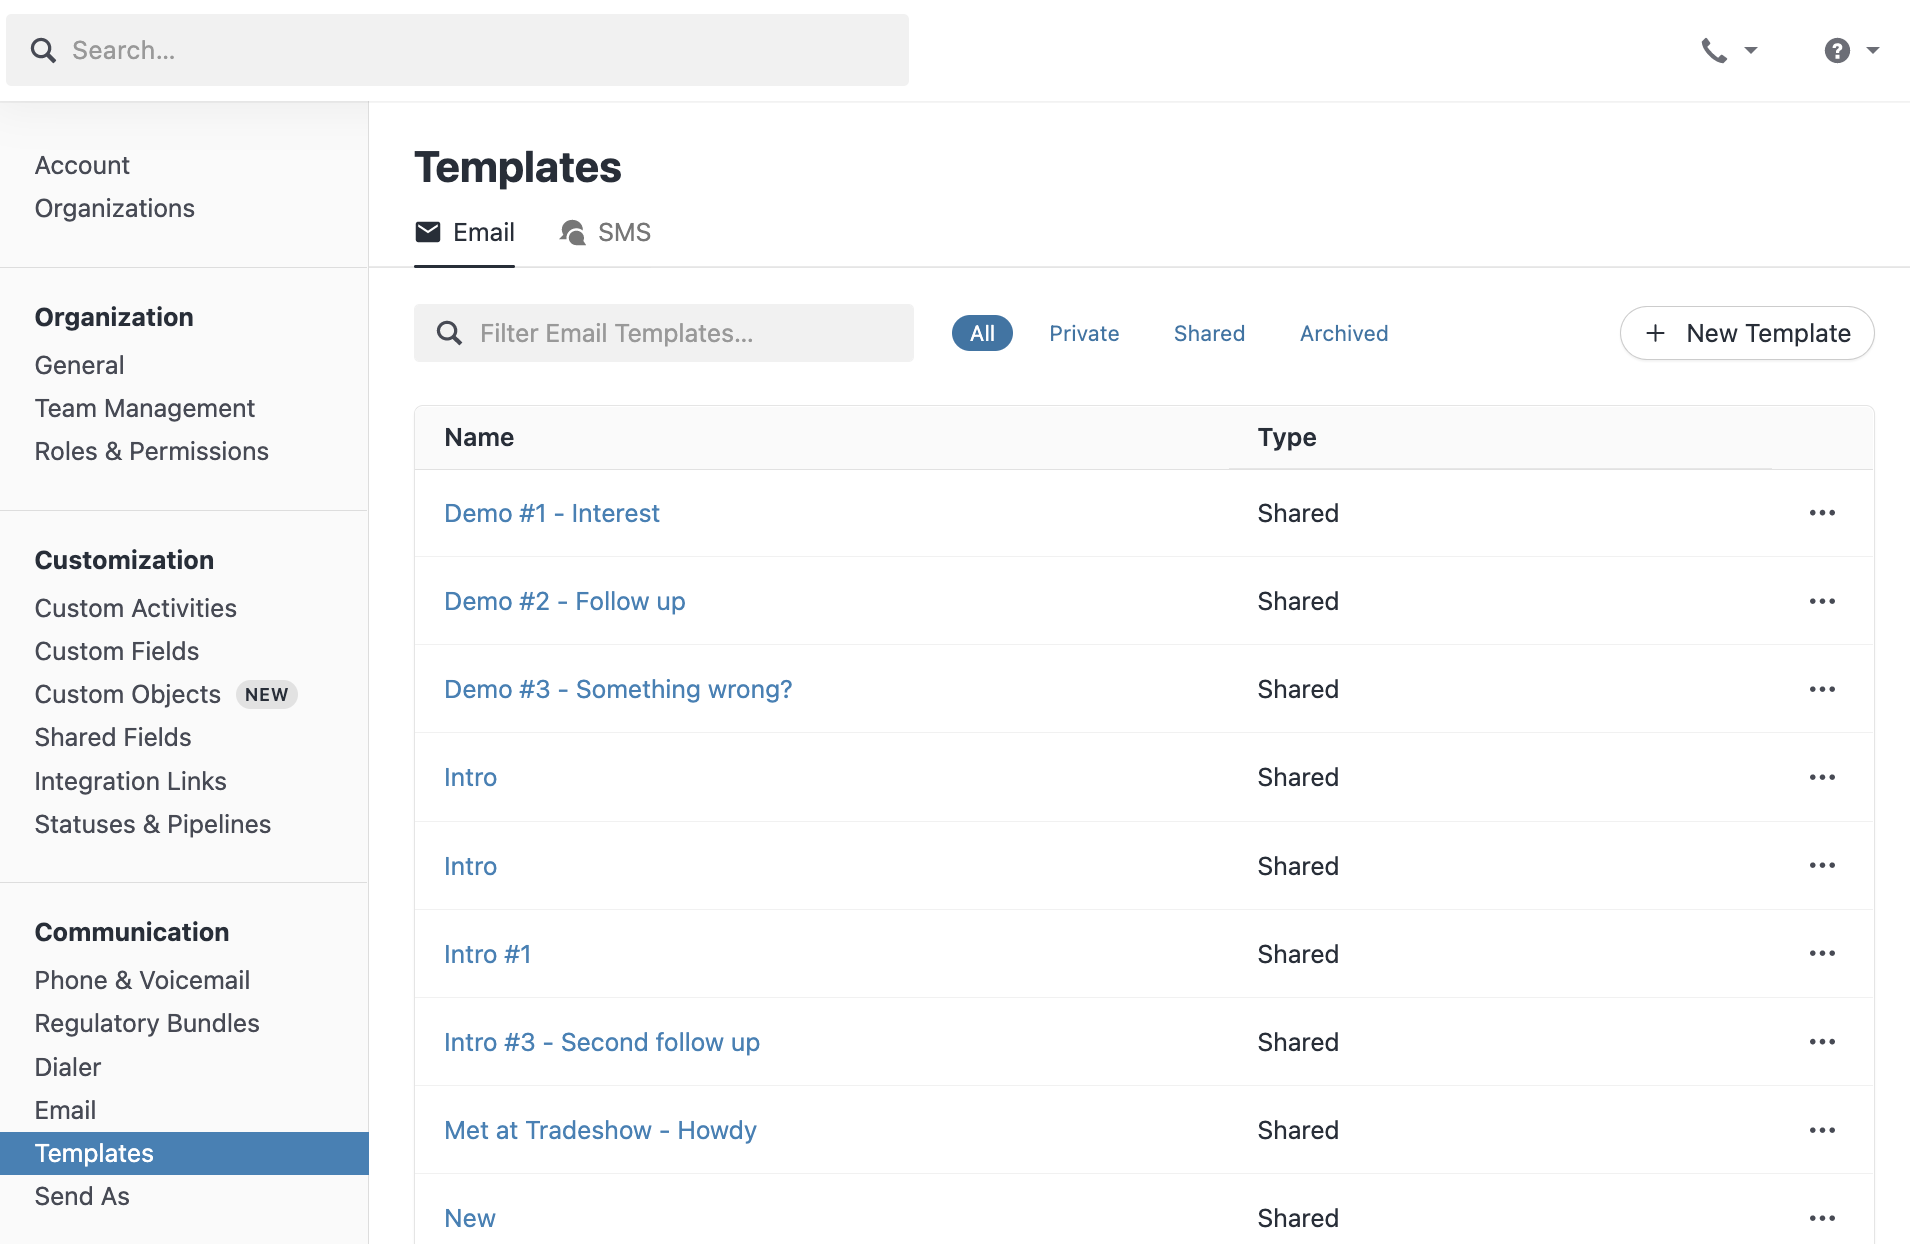
Creating + Sharing Email Templates
If you find yourself sending similar messages repeatedly, you may want to consider using email templates within Close.
To create an Email Template:
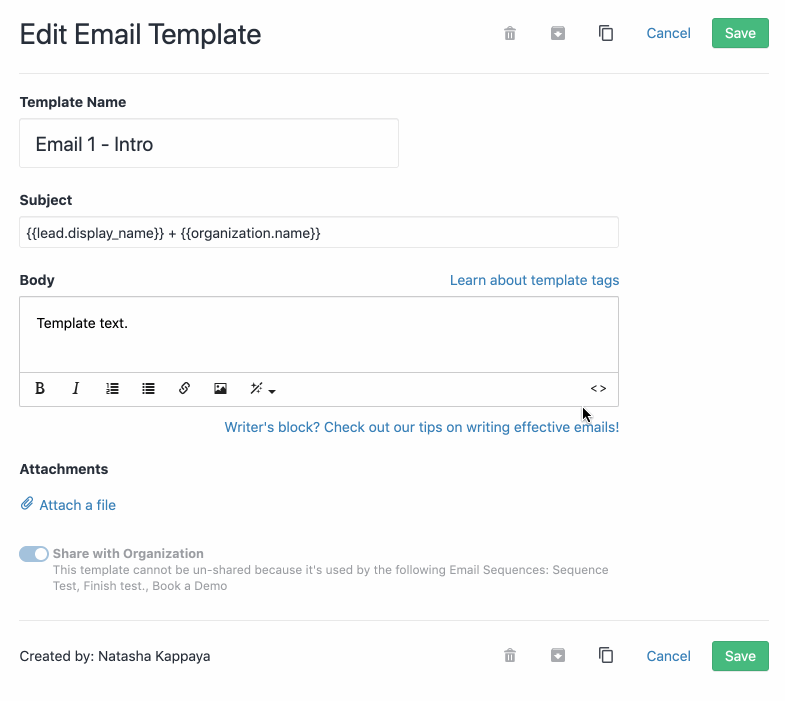
Go to Settings > Communication > Templates. Here you can create, duplicate or view any Template that is available to you. SMS Templates can also be created and edited in this section.
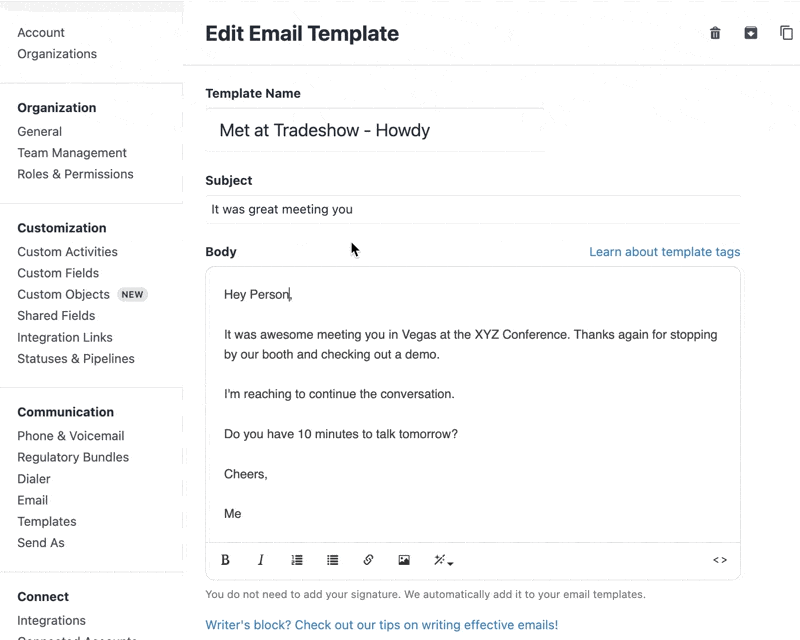
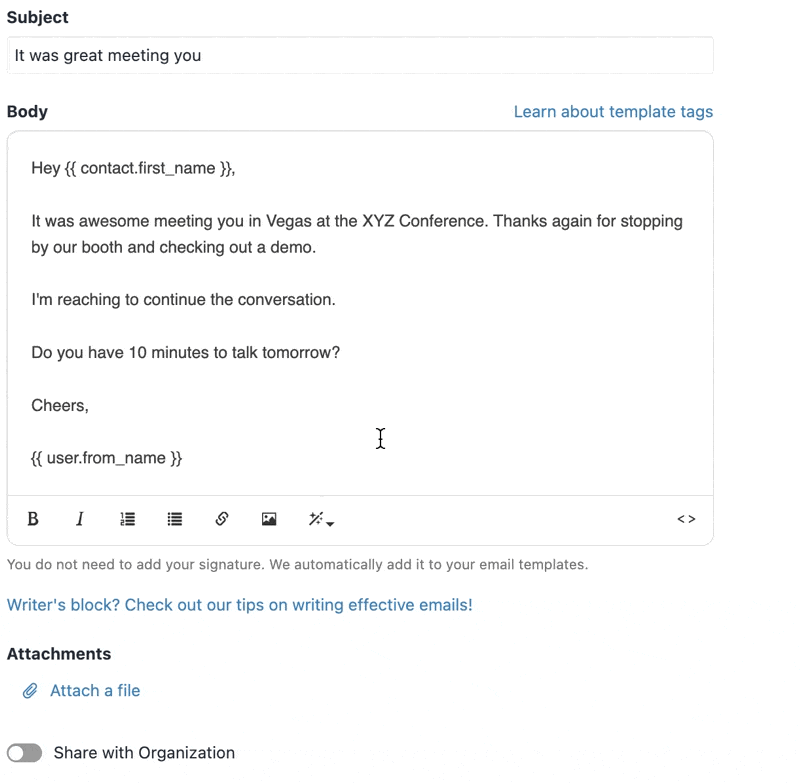
You can also customize your Template with Template Tags. Template Tags allow you to add dynamic lead data to your Email Templates. You can use these tags to pull in information like the Lead Name, Contact Information, any Lead or Contact Custom Fields, etc. Tags will pull individual lead or contact information and embed it into the email automatically.
 Adding Template Tags Default Template Tags:
| Template Tag | Description |
|---|---|
| {{organization.name}} | The name of your organization. |
| {{lead.display_name}} | The lead's name is on the top left of the lead page (the company name). We will default to the contact name if there's no lead name. |
| {{lead.name}} | The name of the company you are emailing if there is one. |
| {{contact.name}} | The full name of the person you are emailing. |
| {{contact.title}} | The title of the person you are emailing. |
| {{contact.first_name}} | The first name of the person you are emailing. |
| {{contact.last_name}} | The last name of the person you are emailing. |
| {{contact.primary_phone.phone}} | The primary phone number of the contact. |
| {{contact.primary_email.email}} | The primary email address of the contact. |
| {{contact.primary_url.url}} | The first URL of a contact. |
| {{contact.custom.["Custom Field Name"]}} | Value of a given Custom Field on a given Contact. Input the name of the Custom Field in the |
| {{lead.url}} | The URL on the lead page. Listed under the company name. |
| {{lead.description}} | The description on the lead page. Listed under the company name. |
| {{lead.status_label}} | The current status of the lead. |
| {{lead.primary_address.address_1}} | The first part of the lead's address. |
| {{lead.primary_address.address_2}} | The second part of the lead's address. |
| {{lead.primary_address.city}} | Lead's primary city. |
| {{lead.primary_address.state}} | Lead's primary state. |
| {{lead.primary_address.zipcode}} | Lead's primary zip code. |
| {{lead.primary_address.country}} | Lead's primary country code. |
| {{lead.primary_address.country_name}} | Lead's primary country name. |
| {{lead.custom.["Custom Field Name"]}} | Value of a given Custom Field on a given Lead. Input the name of the Custom Field in the |
| {{user.from_name}} | The user's full name (as indicated on the email settings page). |
| {{user.from_email}} | The user's email address (as indicated on the email settings page). |
| {{user.email}} | The user's Close account email address (as indicated on the profile page). |
| {{user.phone}} | The user's primary phone number (as indicated in Settings > Phone & Voicemail). |
| {{user.full_name}} | The user'sfull name (as indicated on the profile page). |
| {{user.first_name}} | The user'sfirst name (as indicated on the profile page). |
| {{user.last_name}} | The user'slast name (as indicated on the profile page). |
If you're creating Templates for your team, you can choose to share the Template with the rest of your organization.
Template Tags as Hyperlinks URLs
It is possible to include some template tags as the URL part of hyperlinks. This functionality is currently limited to fields without spaces or special characters in their names. It should work for all fields except for custom fields whose names contain spaces or non-alphanumeric characters.
Advanced Email Template usage
Email Templates use a templating engine called Liquid. Liquid allows you to work with dynamic content to create highly personalized emails. Using the Liquid templating language, you can do things like:
- Set a default name if one doesn't exist;
- Capitalize words;
- Format dates;
- Conditionals;
- and much more!
Let's look at a few examples where this is useful.
Setting a default for `{{contact.name}}` if it doesn't exist on the contact.
Hi {{contact.name | default: "there"}}- Thanks for checking out our service... If {{contact.name}} is empty, the word "there" will be inserted instead.
Capitalizing names to ensure consistency on the data in Close.
Hi {{contact.name | default: "there"}}- Great to see you and the team at {{lead.name | capitalize}} are considering our service.. The tag {{lead.name | capitalize}} will capitalize the first word in the {{lead.name}} dynamic content.
Formatting dates for your custom field.
Hi {{contact.name | default: "there"}}- Noticed you signed up on {{lead.custom.["Date created"] | date: "%A" }}... This will take the date value of the tag lead.custom.["Date created"] and format it to only display the day. For example, if the dynamic date value were 2022-07-31, it would output "Sunday". See more date formatting options below.
Using conditionals to display content.
Next steps are to {% if lead.custom.["Score"] == "High" %}book a call{% else %}sign up for a trial{% endif %}. Here we check the value of lead.custom.["Score"] and display a different message depending on that value. In this case, if the value is "High" we want the CTA to be "book a call." For all other values, the CTA is to "sign up for a trial."
Using Liquid, we now have a dynamic, highly personal email to send.
Here are some other popular filters in Liquid that are now possible when creating templates in Close:
- [Date formatting](https://shopify.github.io/liquid/filters/date/)
{{lead.custom.["Date created"] | date: "%a, %b %d, %y"}} - [Adding numbers](https://shopify.github.io/liquid/filters/plus/)
{{ lead.custom.["Order Count"] | plus: 3 }} - [Lowercasing strings](https://shopify.github.io/liquid/filters/downcase/)
{{ "Apple" | downcase }} To see everything you can do with Liquid, head to their official documentation for details.
Limitations.
Currently, any Liquid syntax you insert into your templates will appear as its own line when we render the email. If you use a Liquid tag or filter that doesn't have any output (like a conditional), it can lead to unexpected formatting. Liquid Whitespace control is not supported in our editor.
Test your Templates!
It's always a good idea to test templates before using them in Sequences or sending them directly to Contacts.
Catch any errors or formatting issues beforehand and send with confidence.
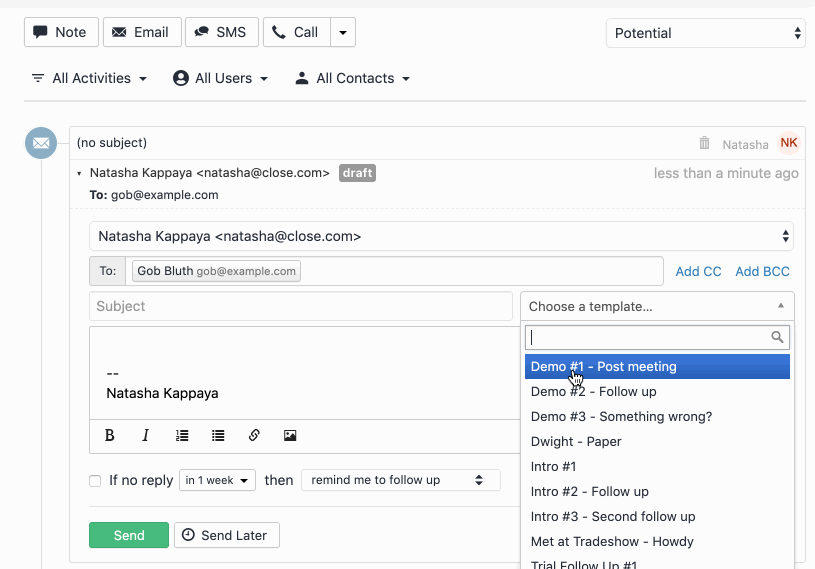
Sending Email Templates
Now that you have a Template set up, you can use the Template when emailing your leads.
Simply select your Template from the dropdown when drafting your email.
Your Template will populate and allow you to edit if necessary.
 Sending an Email Template
Bulk Emailing
If you're on our Professional or Business Plan, you can also take advantage of Bulk Emailing from within Close.
Close Pro Tip: Set Up a Smart View to Use Bulk Email!
Before initiating a Bulk Email, it's essential to set up a Smart View that identifies the leads you want to email and excludes the ones you don't.
If you need help coming up with sales email templates, check out these Close blog posts:
- 5 cold email templates that will generate warm leads for your sales team.
- How to perfect your cold email outreach.
- Sales email subject lines: 50+ tips, examples, and biggest mistakes.
Once you have your list of leads prepared, simply click the Email button at the top of the lead list to initiate a bulk email.
You'll have a few options to select from while configuring your Bulk Email.
- From - Choose who the message will appear to come from (this will only appear if you can send it from multiple addresses).
- Template - Decide which Template you'll be sending.
- For each Lead, email... - Your choices here are the first Contact on the Lead or all Contacts on the Lead. This may vary based on the context of the Bulk Email.
Once you've decided on these items, you'll be able to preview your Bulk Email. Previewing allows you to review your Template Tags and ensure that the message you're sending is the correct one. Click the arrow at the top of the viewing window to scroll between recipients. If everything looks good, click send. Your Bulk Email will be sent, and you'll receive an email once it's completed.
 Bulk emailing in Close
Automatic email address duplicate detection.
If you have the same email address on multiple leads, Close will avoid sending an email to the same duplicate email address multiple times.
This works out of the box without any configuration required.
Is there a limit for bulk emailing?
Bulk emails are sent just like any other email you send in Close; they are sent through your SMTP email server (listed under your Settings > Connected Accounts), so it's essential to know your email service provider's daily limits.
Most email providers, such as Gmail / Google Apps and Office 365, will throttle or restrict the quantity or frequency of outgoing emails you can send in a given period. If you go over those limits, they will likely disconnect your email account from Close, and you'll see an error under Settings > Connected Accounts.
Close Pro Tip: Prevent your outbound emails from being halted!
If you plan on sending more than 1000 emails in 24 hours, your email server may halt your outbound emails from sending. We recommend you set up a 3rd party email service like Mailgun/SendGrid for sending larger quantities of email. This limit may be lower depending on your Email Service Provider.
Using a separate email service for outgoing emails
You can set Close to use a dedicated email sending service like Mailgun, Sendgrid, Mailchimp, or Amazon SES. When doing this, we recommend you:
- Keep sending emails "From" your primary email address.
- Follow your provider's instructions to update your DNS records. You'll want your SPF records to indicate that their service has permission to send emails from your domain name.
- Change your outgoing email settings (SMTP) in Close. Enter the SMTP host, username, and password information that Mailgun, Sendgrid, Mailchimp, or Amazon SES provides you.
- Keep your incoming email (IMAP) settings in Close the same so that they point at your primary email inbox server (e.g., imap.google.com or whatever email system your primary work email system uses).
Check out a walkthrough of this process (using Mailgun) over here.
If everything is set up and working correctly, recipients of your emails won't notice that you're using a 3rd party service to send the email. And your incoming emails should continue showing up inside of Close.
Sending Email Error
Sometimes an error might occur while trying to send out your emails. Those emails will be indicated by a red errortag and an explanation of why sending failed.
Usually, when there is a problem with email sending, Close will first retry sending several times in a row (automatically) while the email is in outboxstatus, until failing and transitioning into an errorstate where your action is required.
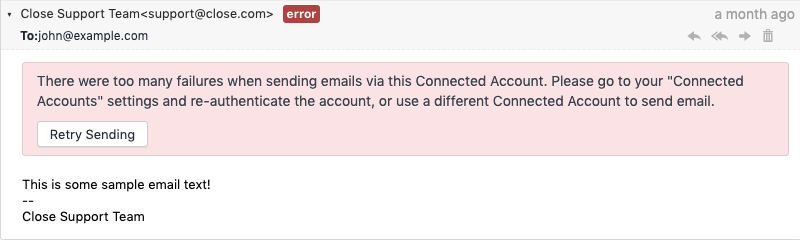 Email Error
The most common error is that your email account (located under Settings > Connected Accounts) disconnected due to one of the following:
- your email credentials changed (you changed your email password);
- you enabled/disabled the email 2FA (multi-factor authentication);
- you went over the sending limits, and your email provider blocked you from sending more (refer to the section above on how to get around this).
When something like that happens, you'll receive a Close email [Close] Action required: Not syncing email accountexplaining what connected account was disconnected and how to re-connect it.
To fix it, go to Settings > Connected Accounts > click on the errored account(usually indicated with a red background) and then:
- if it's a Gmail or Microsoft account - click on
Reconnect..and follow the process; - if it's a Custom email account - click on
Edit IMAP > enter password > click Save, and/or click onEdit SMTP > enter password > click Save.
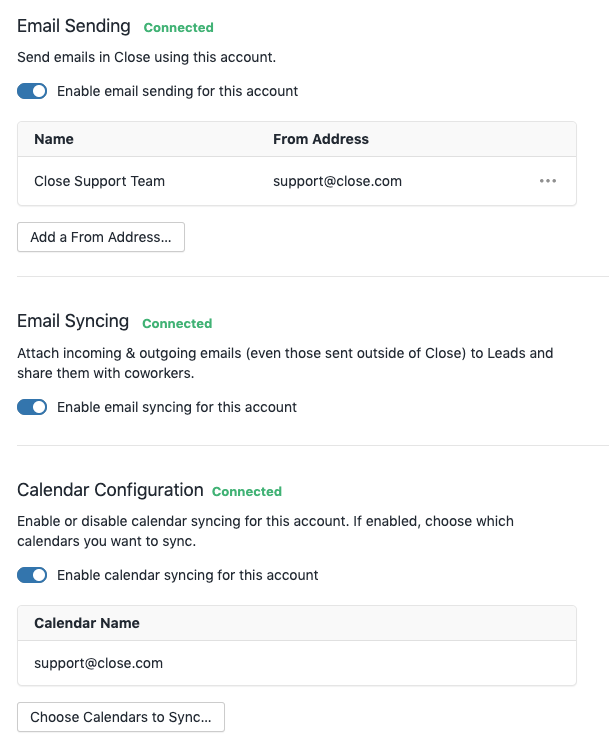
Once re-connected (as indicated by the green Connectedstatus), all emails in your outbox created using this email account (you can find all emails within an outbox with a search query has:outbox_emails) will be sent automatically, and all incoming emails will be synced retroactively.
 Add Filter > Emails > Number of emails in outbox > Some.
However, the emails that are in the error status (you can find all errored emails with a search query has:error_emails) need to be resumed manually by clicking on Retry Sending. If your email sequence was paused and is in error, please reach out to support@close.com to resume all sequence subscriptions after you verify that your email account has reconnected successfully.
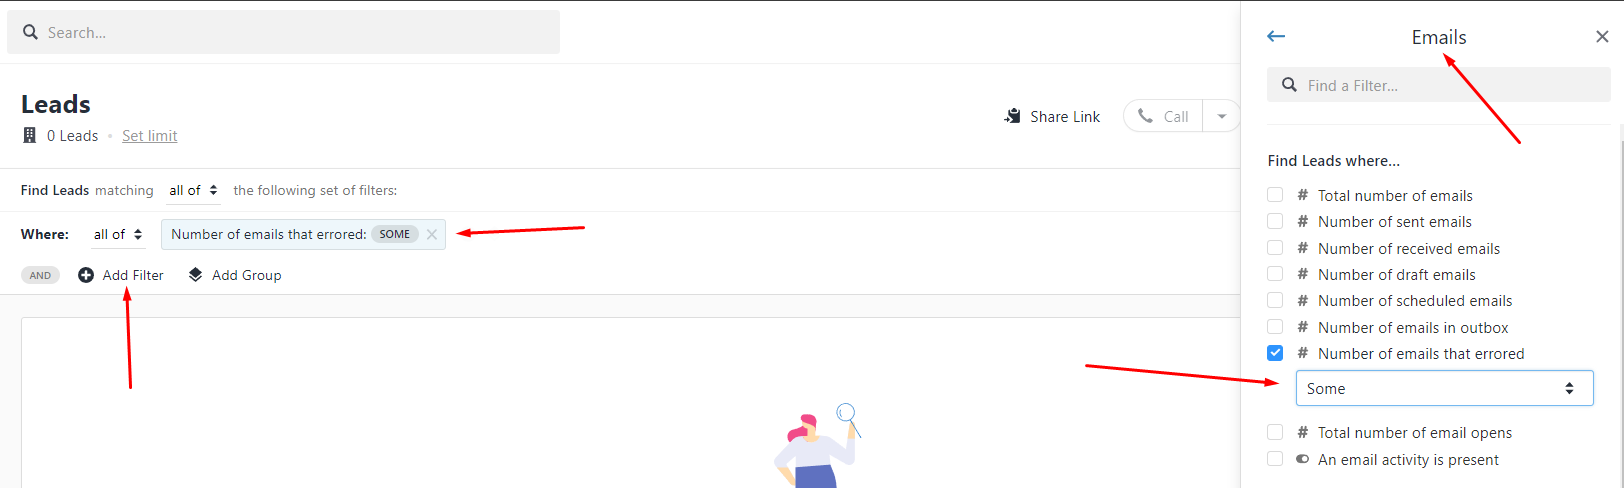 Add Filter > Emails > Number of emails that errored > Some.
Source: https://help.close.com/docs/sending-receiving-email
0 Response to "Contacts Continuing to Get Emails From a Disconnected Email"
Post a Comment